Data Ops
You can perform different kinds of data operations and view all the data under various repositories such as the
Data repository - versioning system
NFS Explorer - the shared disk space on NFS ((Network File System), and
HDFS Explorer - the shared disk space on HDFS (Hadoop Distributed File System).
For more information on these topics, see the following:
Viewing the Data Repository
You can create a new dataset, push new data, and view details of your data from the data repository.
After you log in to the xpresso.ai Control Center, click a solution listed under ‘Active’. On the page that appears, from the left-hand menu, click Data Ops and then click Data Repository. A dashboard appears.
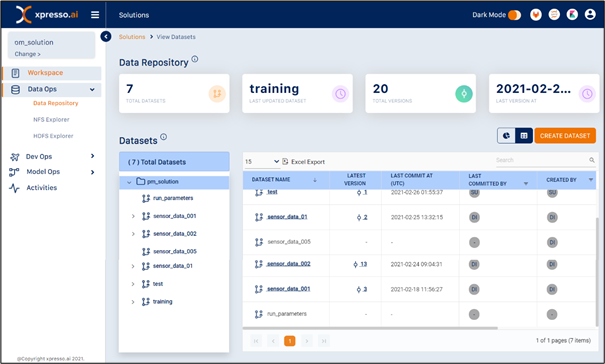
You can view the following details on this page:
Total Datasets
Last Updated Dataset
Total Versions
Last Version At – date and time of last version
Total Datasets
Dataset Name
Latest Version
Last Commit At – time and date of last commit (in UTC)
Last Committed By
Created By
This page provides two options to view details – the “Chart” view and the “Table” view.
Changing View
You can view the details of Datasets using either the Chart View or a Table View. To change the view, on the right corner, click “Chart View” or “Table View”.

From the “Chart View”, you can download details of datasets in PDF or PNG formats. To download, on the left side, from the drop-down, select either PDF or PNG and then click the download icon.

You can also view results from a specific page, search for specific datasets, export your data to an Excel file, and download your data.
To search for a specific dataset, type its name in the search bar on the top right corner.

To choose the number of datasets that you can view on a single page, click the arrow and choose from 5, 10, 15 or 20 entries.

To export your data into an Excel file, click Excel Export.

You can also download the details of a dataset. To download the details in a ZIP file, under the Action column, select the “Download Data” icon.

You can skip to a specific page or move to the first or last page of entries by clicking the page number or the arrows, respectively.

Creating a new Dataset
To create a new dataset, on the top right, click Create Dataset. A dialog box appears.

Enter a name for the dataset and click Submit. A new dataset is added and appears on the Data Repository page.

Tip
The dataset name must satisfy the following constraints:
Must be unique within the solution
Must comprise only:
lowercase, alphanumeric ([a-z], [0-9]) characters, or
underscore (_)
Must start with a letter
Must not end with an underscore (_)
To clear the details that you’ve typed, click Reset.
Adding new data
To add new data to the dataset that you’ve created, under “Total Versions”, select the name of the dataset from the list.

Click New Data. A dialog box appears.

In the dialog box, enter a name for the data and a description.
To add new data files, either drag and drop files from the desired location or click Browse to navigate to a location on your computer.
After the file(s) are uploaded, click Upload All.
Note: To clear the files you’ve selected, click Clear All.
Click Push Data.
Viewing the NFS Explorer
You can create folders, upload files, and view details of files stored on a remote computer.
After you log in to the xpresso.ai Control Center, click on any ‘active solution’. On the page that appears, from the left-hand menu, click Data Ops and then click NFS Explorer. A dashboard appears.

You can view the following details on this page:
Total Files
Disk Space
Last Updated File
Time of Last Update
This page provides two options to view details – the “List” view and the “Grid” view. To switch to the list view, click the “List” icon.

To switch to the grid view, click the “Grid” icon.

You can also search for specific folders or files. To search, type its name in the search bar on the top right corner.

Creating a Folder
To create a folder to upload and store files, click the “Create Folder” icon from either the “Grid” or “List” view. A dialog box appears.

In the dialog box, type the name for a folder and click OK.

Tip
The folder name must satisfy the following constraints:
Must be unique within the solution
Must start with a letter
To clear the name you’ve typed, click Reset.
Uploading a File
To upload and store files, click the “Upload Files” icon from either the “Grid” or “List” view. A dialog box appears.

In the dialog box that appears, either drag and drop files from the desired location or click Browse to navigate to a location on your computer.

After the file(s) are uploaded, click Upload All.
Tip
To clear the files you’ve selected, click Clear All.
Deleting/Downloading a File/Folder
You can download or delete a file/folder you’ve uploaded. To do so, switch to the “Grid” view and then click either the “Delete” icon or the “Download” icon next to the name of the file or folder.

Viewing the HDFS Explorer
You can create folders, upload files, view details of files stored on a remote computer, and perform additional tasks.
After you log in to the xpresso.ai Control Center, click on any ‘active solution’. On the page that appears, from the left-hand menu, click Data Ops and then click HDFS Explorer. A dashboard appears.

You can view the following details on this page:
Total Files
Disk Space
Last Updated File
Time of Last Update
This page provides two options to view details – the “List” view and the “Grid” view. To switch to the list view, click the “List” icon.

To switch to the grid view, click the “Grid” icon.

You can also search for specific folders or files. To search, type its name in the search bar on the top right corner.

Creating a Folder
To create a folder to upload and store files, click the “Create Folder” icon from either the “Grid” or “List” view. A dialog box appears.

In the dialog box, type the name for a folder and click OK.

Tip
The folder name must satisfy the following constraints:
Must be unique within the solution
Must start with a letter
To clear the name you’ve typed, click Reset.
Uploading a File
To upload and store files, click the “Upload Files” icon from either the “Grid” or “List” view. A dialog box appears.

In the dialog box that appears, either drag and drop files from the desired location or click Browse to navigate to a location on your computer.

After the file(s) are uploaded, click Upload All.
Tip
To clear the files you’ve selected, click Clear All.
Deleting/Downloading a File/Folder
You can download or delete a file/folder you’ve uploaded.
Switch to the “Grid” view and then click either the “Delete” icon or the “Download” icon next to the name of the file or folder.
