Workspace
You can view details of a solution and the related dashboards, modify a solution, manage solution pipelines, and clone a solution.
For more information on these topics, see the following:
Viewing details of a solution
To view the details of a solution, click the name of the solution on the “My Solutions” page.
The “Workspace” page is displayed, which shows all the details of the solution.
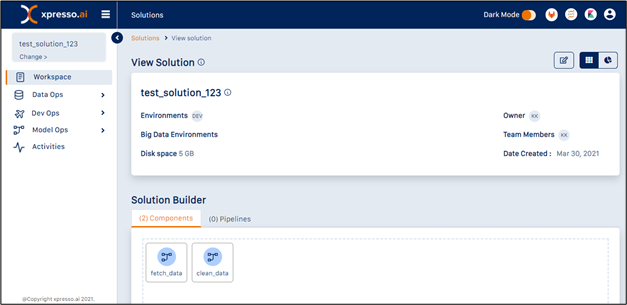
This page has two sections, as described below:
Basic Information Section
This section displays basic information about the solution.
Solution Builder
The Solution Builder enables modification of the components and pipelines in the solution. In this section, you can find the solution toolbar displayed on the top right of the solution panel.

The toolbar displays the following icons:
Modify - click this to modify the solution.
Clone - click this to make a copy of the solution.
View - click these icons to toggle between the solution details and dashboard.
Tip
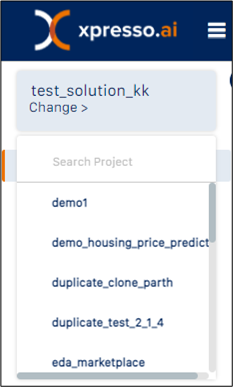
You can switch to a different solution by selecting it from the list on the top-left corner.
Working with Jupyter Hub
To access JupyterHub, on the toolbar of the “Workspace” page, click
the Jupyter Hub icon ![]() .
.
This starts a Jupyter notebook server and opens the “Home” page.
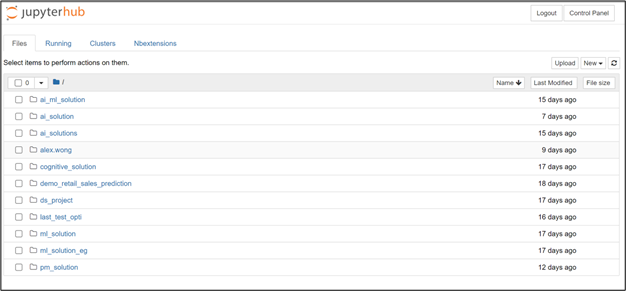
On this page, the following directories are available for use:
One personal directory for your private notebooks
One shared directory for each xpresso.ai solution that you are working on.
Tip
The shared directory is shared with other members working on this solution.
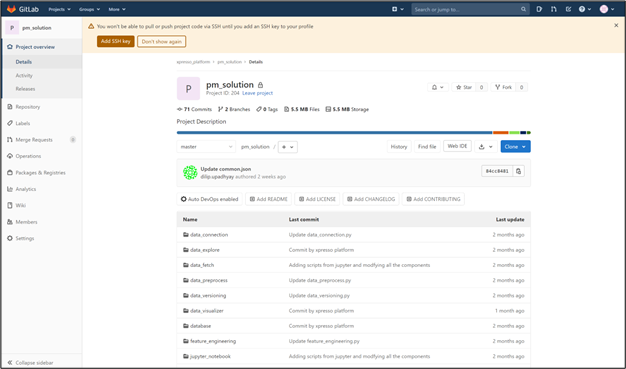
Working with Gitlab
After you create a new xpresso.ai solution, a new Git repository is also created. This contains folders for each component in the solution containing build scripts and the stub source code. The exact folder structure depends on the component type (Job/Service/database/Inference Service) and component “flavor” (Java/Python/SQL/pyspark)
For more information, see here.
Connecting to Gitlab
To access Gitlab, on the toolbar of the “Workspace” page, click the Gitlab icon
 .
.
This opens the project repository on Gitlab.
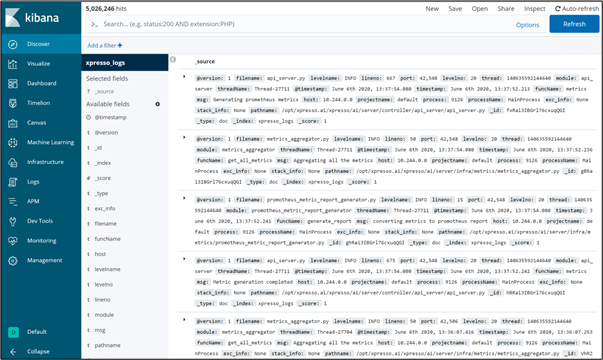
Working with Kibana
You can connect to Kibana and access your logs. For more information on logging library required for this, see here.
Connecting to Kibana
To access Kibana, on the toolbar of the “Workspace” page, click the Kibana icon
 .
.
This opens the “Home” page on the Kibana server.
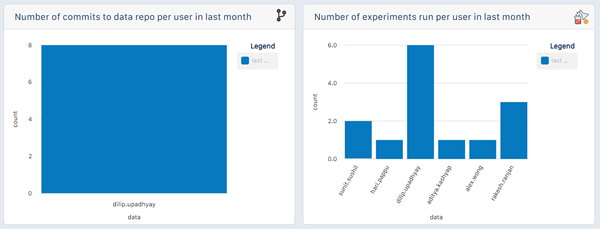
Viewing Dashboard Details
Through the dashboard, you can view the details of your experiments, and various graphical representations.
After “Workspace” page is displayed, from the solution toolbar displayed on the top right of the solution panel, click the Dashboard icon.
![]()
The Dashboard is displayed.
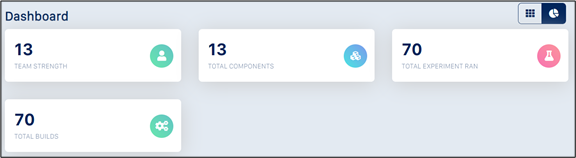
This page has two sections, as described below:
Running Tasks
In this section, you can view a list of tasks that are completed, in progress and yet to be approved. The following details for each task are also shown:
Request type
Date of task submission
Status
Task details
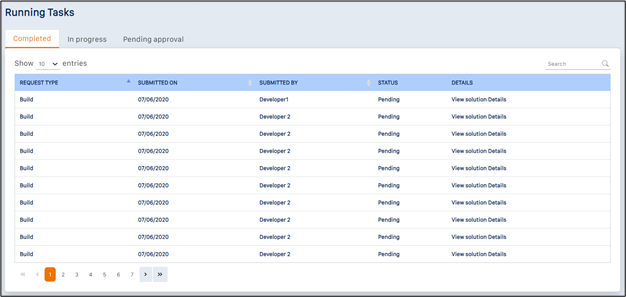
On this page, you can sort each of the columns by clicking on the arrow next to each column name.
You can also search for a specific task by entering its name in the search bar on the top right corner.

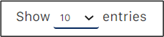
You can choose the number of tasks that you can view on a single page. To specify the number, click the arrow next to Show and choose from 10, 25, 50 or 100 entries.
You can skip to a specific page or move to the first or last page of entries by clicking the page number or the arrows, respectively.

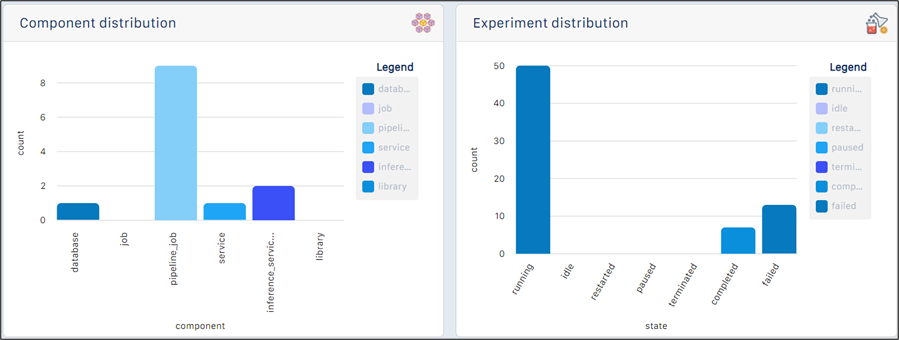
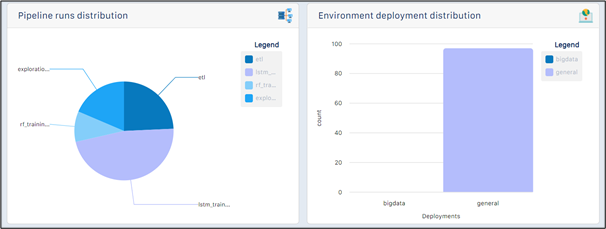
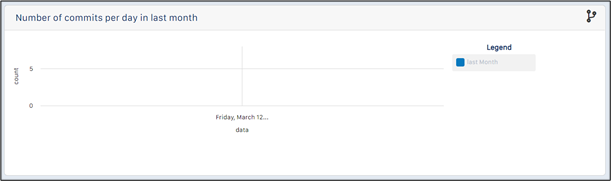
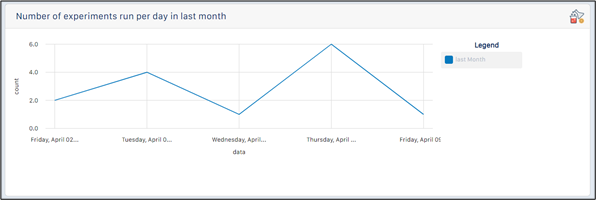
Graphs
In this section, you can view different graphical representations that provide better insights of your activity and experiments.
Modifying a solution
You can change the details of a solution such as the basic information and the components/pipelines.
Modifying Basic Information
To modify the basic information in the solution, click the “Modify” icon on the solution toolbar.
![]()
This enables modification of the basic solution information.

On the page that appears, you can change the following:
Solution Description
Team Members – add one or more team members
Environments - add and remove environments
Big Data Environments - add and remove Big Data environments
Tip
This is possible if the solution has at least one pyspark component.
Modifying Components and Pipelines
You can use the Solution Builder to manage components and pipelines in the solution. The Solution Builder has two tabs:
The “Components” tab enables you to manage solution components.
The “Pipelines” tab enables you to manage solution pipelines.
Managing solution components
To manage the solution components, click the “Components” tab of the Solution Builder.
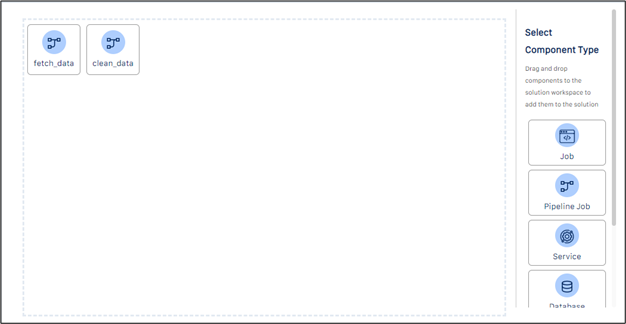
Any existing components at the top of the Solution Builder workspace appears.
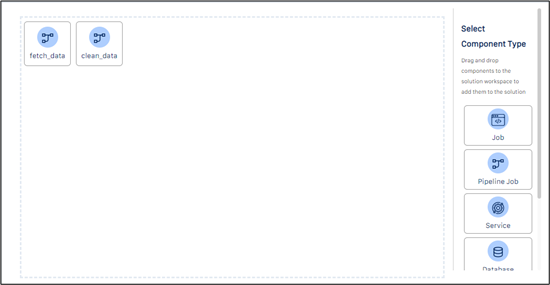
Adding components
To add a component, click on one of the available component types on the right-hand panel and drag it into the Solution Builder workspace (see below for an example of adding a job to the solution)

After you add a component, a dialog box opens.
In this dialog box, you can specify the properties of the new component.
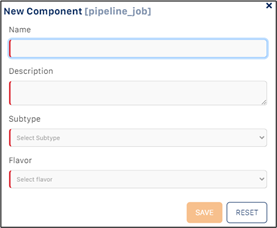
You can specify the following component properties:
Name
Description - provide a brief description of the component.
SubType - select “Custom” if you want to create the component from scratch. Else, select on the of the library components listed.
Flavor - select the programming language you want to use to create the component.
Tip
The component name must satisfy the following constraints:
Must be unique within the solution
Must comprise only:
lowercase alphanumeric([a-z], [0-9]) characters and
underscore (_)
Must start with a letter
Click Save to submit the changes to the solution. The new components are added to the Solution Builder workspace.
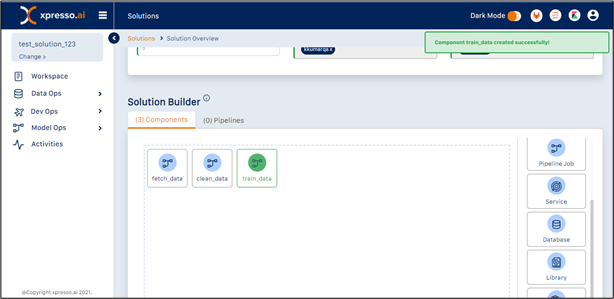
Repeat this process to add more components to the solution.
Click Submit to save the changes to the solution.
Modifying and deleting components
To modify a component, click the component in the Solution Builder workspace. A dialog displaying the component details appears.
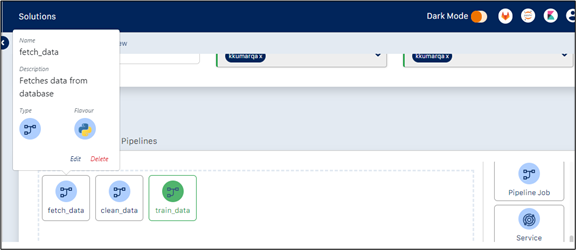
Click Edit to change the component description.
Tip
The component name cannot be modified.
Click Delete to delete the component.
Click Submit to save the changes to the solution.
Managing solution pipelines
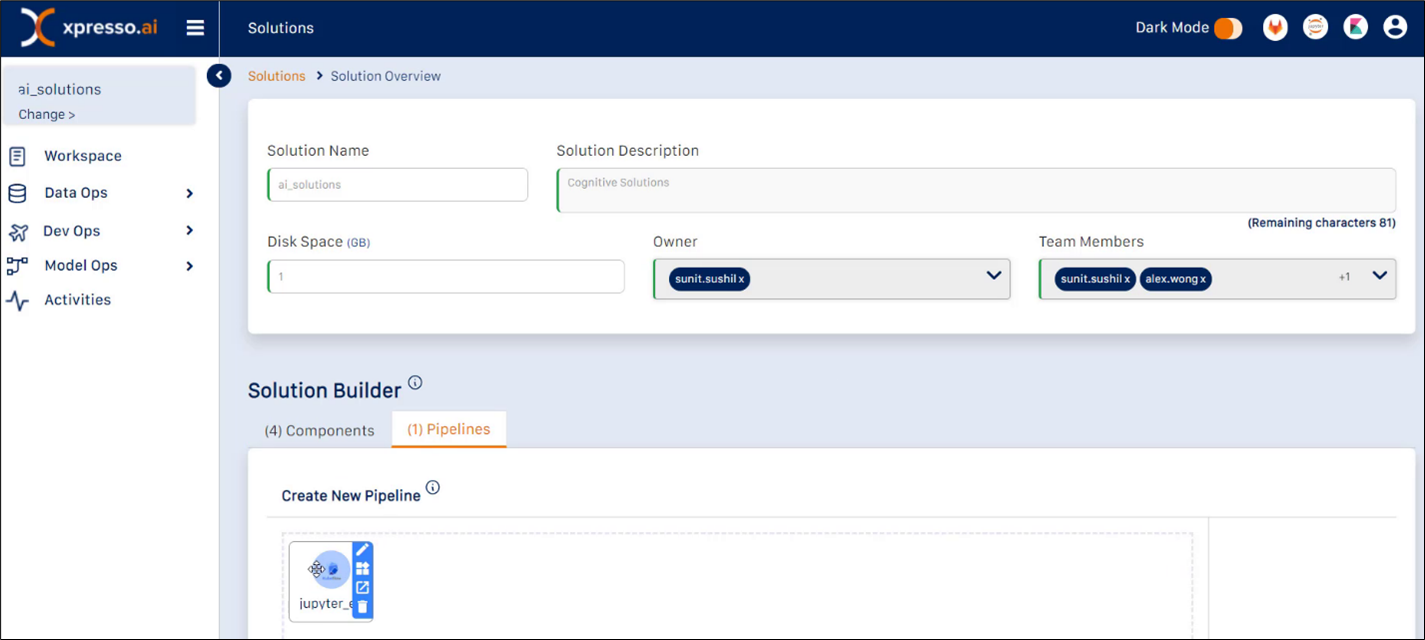
To add a pipeline to a solution, click the “Pipelines” tab of the Solution Builder.
Any existing pipelines at the top of the Solution Builder workspace appears.
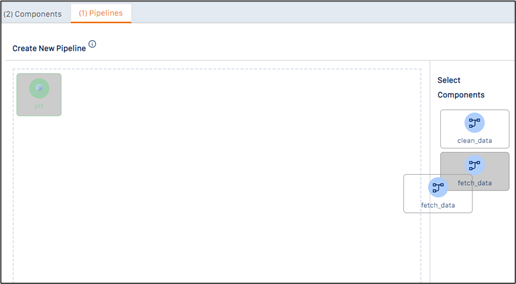
Adding pipelines
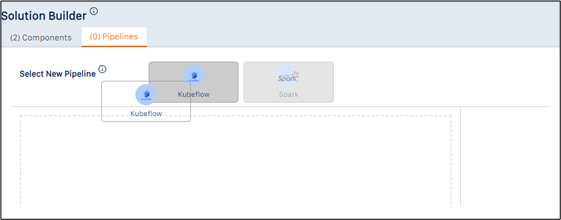
To add a pipeline, click the “Create New Pipeline” link.
Click on one of the available pipeline types on the top panel and drag it into the Solution Builder workspace (see below for an example of adding a Kubeflow pipeline to the solution).
When you add a pipeline, a dialog box opens.

In this dialog box, specify the properties of the new pipeline.
Tip
The pipeline name must satisfy the following constraints:
Must be unique within the solution
Must comprise only:
lowercase alphanumeric([a-z], [0-9]) characters and
underscore (_)
Must start with a letter
Must contain at most 25 characters
Click Save to submit the changes to the solution. A new component is added to the Solution Builder workspace.
Adding components to a pipeline
To add components to a pipeline, first, select the pipeline by clicking the “Select New Pipeline” link. The appropriate components are displayed on the right-hand panel.
Tip
Python and Java components will be available for Kubeflow pipelines, and pyspark components for Spark pipelines.
To add a component to a pipeline, drag the component from the panel, and drop it into the Solution Builder workspace (see below for an example).
You can add multiple pipelines in this manner.
Establishing the dependencies between components
Click on a node port (one of the four ‘+’ signs that appear when you hover your mouse over the component icon) on the first component.
Click on a node port from the second component. This will draw an arrow in the direction of the flow (i.e., from the first component selected to the second - see below).
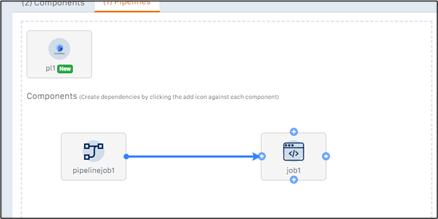
This indicates that when the pipeline is run, the second component will be executed after the first.
Click Save button to create the pipeline.
Modifying a pipeline
To modify a pipeline, click the pipeline icon. A set of buttons are displayed.

To make changes to a pipeline name or description, click Edit. A dialog box is displayed.

You can change the name of a pipeline only if it has not been saved to the solution already.
To make changes to the pipeline flow, click the flow button. You will be able to edit the control flow between the components in the same way that you created the pipeline.
To delete the pipeline, click the Delete icon.
Click Submit to submit the changes .
Tip
When a pipeline is created, xpresso.ai does not make any code changes for non-distributed (Kubeflow) pipelines, since these are just containers of components. However, for distributed (Spark) pipelines, xpresso.ai adds boilerplate code to the solution code repository, as well as a build pipeline in the build system.
Cloning a solution
Cloning a solution helps if you want to create a new solution very similar to an existing one.
To create a copy of a solution, go to the solution “Workspace” page, and then click the “Clone” icon. The Clone Project page appears.
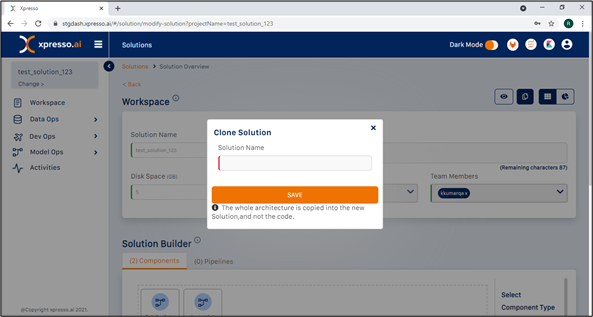
Specify the name of the new solution.
Click Save to save the new solution. The solution details page appears with details of the new solution.
Tip
When a solution is cloned, its architecture is copied over to the new solution, but no code is copied. You must provide the code for the new solution from scratch (or you can copy the code for the old solution manually, if you have access to it).
Creating Components and Pipelines using Jupyter
Through the Jupyter Hub integration, you can create custom Jupyter notebooks, add a component with the flavor Jupyter, write your code in Jupyter, and add/modify comments to the code. This enables you to have a dedicated Jupyter Notebook for each component. On opening Jupyter Notebook, you can view the pre-code in a structured format in Jupyter that allows you to try out your code and push the code directly into Gitlab from a Jupyter Notebook.
Creating a Component with type Jupyter
To create a component with type Jupyter, click the name of the solution on the “My Solutions” page. The “Workspace” page is displayed, which shows all the details of the solution.
From the top-left, click Modify Solution.
![]()
To add a component, on the right-hand panel, click “Pipeline Job” and drag it into the Solution Builder workspace (see below for an example of adding a pipeline job to the solution)
After you add the “Pipeline Job” component, a dialog box opens.
In this dialog box, you can specify the properties of the new component.
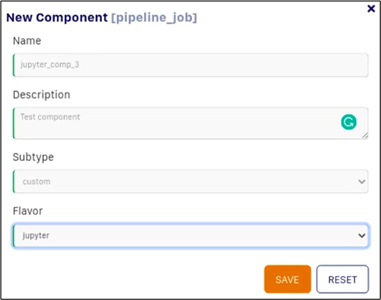
You can specify the following properties:
Name
Description - provide a brief description of the component.
Subtype - select “Custom”
Flavor - select “jupyter”
Tip
The component name must satisfy the following constraints:
Must be unique within the solution
Must comprise only:
lowercase alphanumeric([a-z], [0-9]) characters and
underscore (_)
Must start with a letter
Click Save to submit the changes to the solution. The new components are added to the Solution Builder workspace.
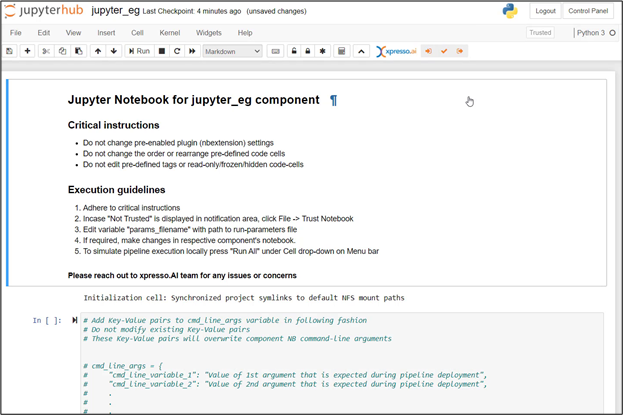
This adds a different type of skeleton code to Gitlab. (see below for an example)

Tip
A skeleton Jupyter notebook is available inside the component you’ve added.
Editing Code in Jupyter Hub
You can edit the Jupyter Notebook that you’ve created in Jupyter Hub.
To edit the Jupyter Notebook, click the name of the solution on the “My Solutions” page. The “Workspace” page is displayed, which shows all the details of the solution.
From the top-left, click Modify Solution.
![]()
On the Solution Builder workspace that appears, click the component name. A dialog displaying the component details appears.
Click Edit Code to open the Jupyter Notebook with pre-written code present in the code repository. (see below for an example)
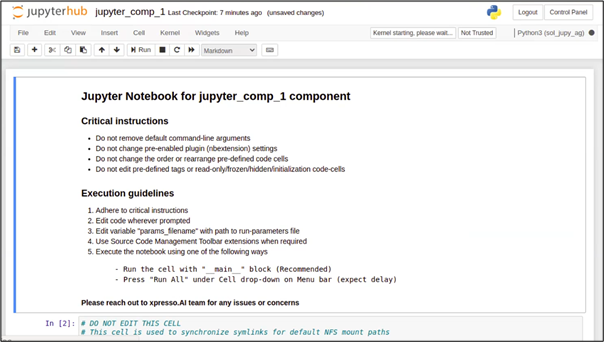
Tip
This is like the skeleton code provided in Gitlab.
The component name cannot be modified.
On this page, you can do the following:
Edit the code like editing code in Jupyter Notebook.
Push the code to Gitlab by using the xpresso.ai toolbar.

Update the code from the Gitlab code repository by pulling it.

Update the Jupyter Notebook with the latest code repository branch from Gitlab

Tip
You can only change a branch here and cannot create a new one. To create a new branch, you can use Gitlab.
Log on to xpresso.ai environment using your xpresso.ai credentials.

Log out of the xpresso.ai environment.

Testing a Pipeline using Jupyter Notebook
You can run each of your components in sequence. This calls each individual component and runs it on your own system through Jupyter Notebook, which ensures that your code works as expected when built and deployed to production.
To test a pipeline, click the name of the solution on the “My Solutions” page. The “Workspace” page is displayed, which shows all the details of the solution.
Click the “Pipelines” tab and select the required pipeline.
Next to the pipeline you’ve selected, click the
 icon.
icon.
Note
A pipeline of this kind can be tested only if all the components are of type ‘Jupyter’.
Another Jupyter Notebook with all components in sequence opens.
To test your pipeline, run each of the components individually.