Deploying components
To deploy a component, first open the “New Deployment” page. See here for instructions on how to navigate to this page.
On this page, select the target environment you wish to deploy to from the “Target Environment” drop-down. You can only select one environment at a time. The drop-down will display only the environments that have been set up for the solution. Note that your component cannot be deployed to a “higher” environment, unless it has been deployed to all configured “lower” environments earlier. For example, if your solution has DEV, QA and PROD environments, you cannot deploy a version of a component to PROD unless it has been deployed to DEV and QA earlier.
Next, expand the “Components” section of the page and select the component(s) you wish to deploy (see below for an example)
There is no need to deploy components if they form part of a pipeline
If you intend your components to be used as part of a pipeline, there is no need to deploy them individually. You can just specify their deployment details when you deploy the pipeline
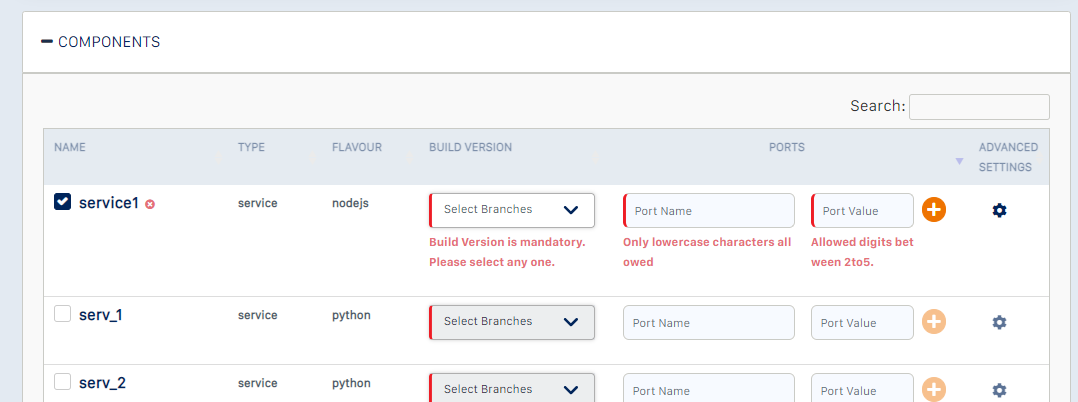
The red cross against each selected component indicates that the deployment parameters for the component have not been configured.
The mandatory parameters can be filled in on the same page, while you need to click the “Advanced Settings” icon to specify optional deployment parameters.
Build Version - select the build version of the component that you want to deploy. This will usually be the latest version. If the component you wish to deploy is from the xpresso.ai Component Library, you can specify the Custom Docker Image instead, using the “Advanced Settings” dialog (see below)
Port name and value - for components of type “service”, you must specify the names and values (i.e., port numbers) for the ports that your service will expose internally, for use by other components. At least one port (usually named “default”) is mandatory. The port name should be specified in lower case characters. The port value should be an integer, between 2 and 5 digits long. This must be the same as the port number specified in the code when running the service within Flask.
When the mandatory component deployment settings have been specified, you should see a green check mark against the component, to indicate that its deployment parameters have been set.
To specify optional parameters, click the “Advanced Settings” icon. The “Advanced Settings” dialog will be displayed (below).
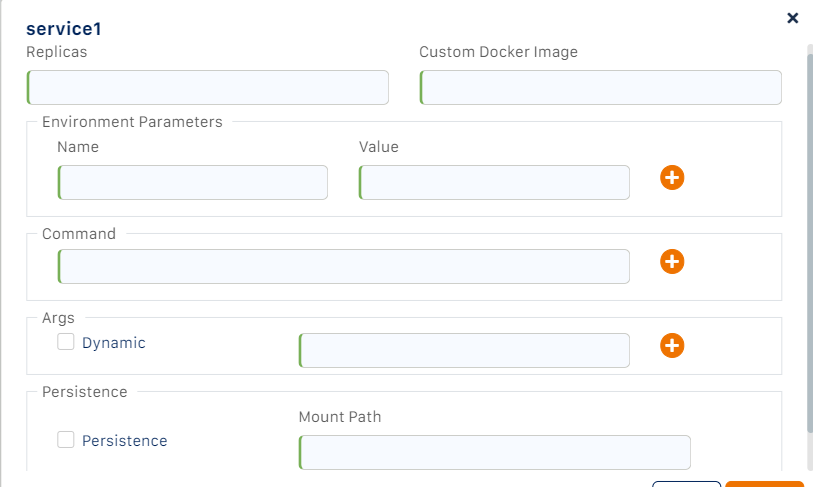
You can specify the following deployment parameters for the component:
Replicas - this indicates the number of copies of the component that you want to deploy. This is useful for service components when you expect a large number of requests on the component. xpresso.ai will automatically create a load balancer, which will distribute the incoming requests among the service replicas. Set this to an integer greater than zero.
Custom Docker Image - if you are deploying a pre-built component (e.g., from the xpresso.ai Component Library), you can specify the Docker Image URL instead of the Build Version. See how you can use components from the xpresso.ai Component Library in your solution
If you specify both the Build version and the Custom Docker image for the component, the Custom Docker image will be used
Environment Parameters - you can specify the environment parameters passed to the component, as name-value pairs. Use the “+” icon to add more environment parameters, and the “-” icon to remove any.
Command - enter any commands that you want the Docker image of the component to run. Use the “+” and “-” icons to add and remove commands.
Args - specify any argument values to the commands executed within the Docker image of the component. If you want to specify the argument name, and specify the argument value at run-time, check the “Dynamic” checkbox, and enter the argument name.
Note that the dynamic argument option is applicable only when a component is included in a pipeline. When a component is deployed on its own, it is run immediately, with the argument values passed to it as part of the command - dynamic arguments are not supported
Persistence - each component has access to the shared file system, from which it can access any files required. To use this drive, check the “Persistence” checkbox, and specify the mount path, which will be used by your component to access the files. For example, if you specify the mount path as “/data”, this will be the root folder for the mount, and hence, your component should use “/data” as the prefix for accessing any files on the NFS drive.
Job Sub-Type - components of type “job” or “pipeline_job” can optionally be deployed as Cron (scheduled) jobs. If you want your job to be scheduled, specify the “Type” as “cronjob”, and then specify the “Cron Schedule” using Cron format (see https://streamsets.com/documentation/controlhub/latest/help/controlhub/UserGuide/Scheduler/SchedulerExpression.html for details). If you do not want to schedule the job, specify the “Type” as “job” instead of “cronjob”
Click “Update” on the “Advanced Settings” dialog to save the optional parameters, and return to the “New Deployment” page
Repeat this configuration step for each of the components selected for deployment.
When you are done, click the “Deploy” button to deploy the selected components.
You can deploy multiple components and pipelines together. To do this, select and configure them for deployment. However, you cannot deploy to multiple environments simultaneously.
If the deployment is successful, you should see a status message, on which you can expand the components section to see the result for each component. You can view the status of the deployment by clicking the “view-status” link
What do you want to do next?